Chimney Cake Recipe – Easy Hungarian Kürtőskalács at Home
If you love cilantro, this sauce is going to become your new best friend. This chimichurri recipe cilantro version swaps the usual parsley for a full bunch of fresh cilantro. The result is brighter, bolder, and honestly a little addictive.
Put it on steak. Put it on chicken. Dip bread in it. Drizzle it on rice. You really cannot go wrong.
Is This Real Chimichurri?
Fair question. Traditional chimichurri comes from Argentina. The classic version is a homemade Argentine sauce made with parsley, garlic, olive oil, and red wine vinegar – no cilantro at all.
So this is a variation. A delicious one. Instead of parsley, you use cilantro. That one change gives the sauce a totally different feel. It’s fresher and a bit more citrusy. Think of it as parsley and cilantro sauce but leaning all the way into the cilantro side.
If you love that bright herb flavor, you’re going to love this.
What You Need
This is a short list. Everything is easy to find.
- 2 cups fresh cilantro, stems and leaves both included
- 3 garlic cloves, peeled
- ¼ of a small red onion, cut into rough chunks
- 2 teaspoons red pepper flakes
- 2 teaspoons dried oregano
- 2 tablespoons red wine vinegar
- 1 cup extra virgin olive oil
- Salt and pepper to taste
That’s it. These are the same building blocks as a classic cilantro chimichurri sauce, just put together in a slightly different way.
A quick note on the onion — a shallot works just as well here if you want a milder flavor. Both give the sauce a nice bite without being too sharp.
How to Make It
This whole thing takes about 10 minutes. You’ll need a blender or a food processor.
Step 1: Add the cilantro, garlic, onion, red pepper flakes, oregano, vinegar, and half the olive oil into the blender or food processor.
Step 2: Pulse until everything is finely chopped. You don’t want a smooth puree. Aim for a texture that’s a little chunky — like a rough chop, not a smoothie.
Step 3: Pour in the rest of the olive oil. Stir gently to combine. Don’t blend again at this point. Just fold it in.

Step 4: Taste it. Add salt and pepper as needed.
Step 5: Transfer to a jar and let it sit for at least 20 minutes before using.
Done. Your easy green chimichurri recipe is ready.

Why the Resting Time Matters
Don’t skip the wait. Those 20 minutes let the garlic, herbs, and vinegar all come together. The flavor after resting is so much better than right after blending.
Ideally, make this the day before you need it. Overnight in the fridge makes it taste even more incredible. Just take it out about 15 minutes before serving so the olive oil softens back up.
The longer it sits, the more the flavors develop. This is actually one of those sauces that gets better with age.
All the Ways to Use It
This cilantro garlic herb sauce is one of the most flexible things you can keep in your fridge. Here are some ideas:
As a topping. Spoon it over grilled steak, chicken, shrimp, or fish. Even roasted vegetables love it.
As a marinade. Use it as a chimichurri marinade recipe for chicken or pork before grilling. Let the meat sit in it for 30 minutes to a few hours.
As a dipping sauce. This makes a brilliant fresh cilantro dipping sauce for bread, grilled corn, or roasted potatoes.
As a dressing. Thin it out with a little extra vinegar and drizzle it over a salad. It works really well over a simple green salad or even a grain bowl.
Seriously, keep a jar in your fridge and you’ll find a new use for it every day.
A Few Helpful Tips
Use the stems too. Cilantro stems have just as much flavor as the leaves. There’s no need to pick them off. Just throw the whole bunch in.
Don’t over-blend. A food processor is better than a regular blender here. You want texture, not a green smoothie. Pulse in short bursts and check as you go.
Go easy on the salt at first. As the sauce sits, the salt becomes stronger. Add a little, wait, taste again. You can always add more but you can’t take it out.
Want more heat? Use a fresh chopped chili instead of red pepper flakes. Even a small jalapeño works well here and gives the sauce a nice kick.
Storing It
Keep the sauce in a sealed jar in the fridge. It stays good for about a week. Actually, it tastes best around day two or three once all the flavors really settle in.
You can also freeze it in small portions — an ice cube tray works great for this. Frozen portions last up to a month and are perfect for dropping into a pan marinade or sauce later on.
Quick Questions
Can I use both cilantro and parsley?
Absolutely. Some people use half and half. You’ll get a more balanced, classic flavor with a hint of the brightness that cilantro adds.
What if I don’t have a blender?
Chop everything very finely by hand and mix it all together in a bowl. It takes a little more time but it works just as well. Some people actually prefer the hand-chopped texture.
Can I make it without the onion?
Yes. The onion adds depth but it’s not essential. Leave it out if you want the garlic and cilantro to be front and center.
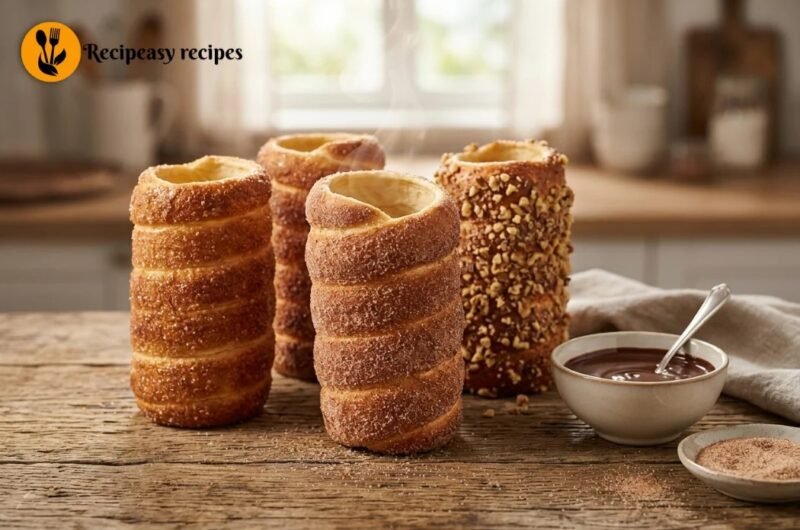
The First Time I Made a Chimney Cake, My Kitchen Smelled Like a European Christmas Market
Course: DessertCuisine: Hungarian / RomanianDifficulty: Easy4
servings20
minutes20
minutes420
kcalThis chimney cake recipe creates a traditional Hungarian-style Kürtőskalács with a caramelized cinnamon sugar crust and soft pull-apart layers inside. Made with a simple yeasted dough and baked in a regular oven, this homemade version delivers authentic street-market flavor without special equipment.
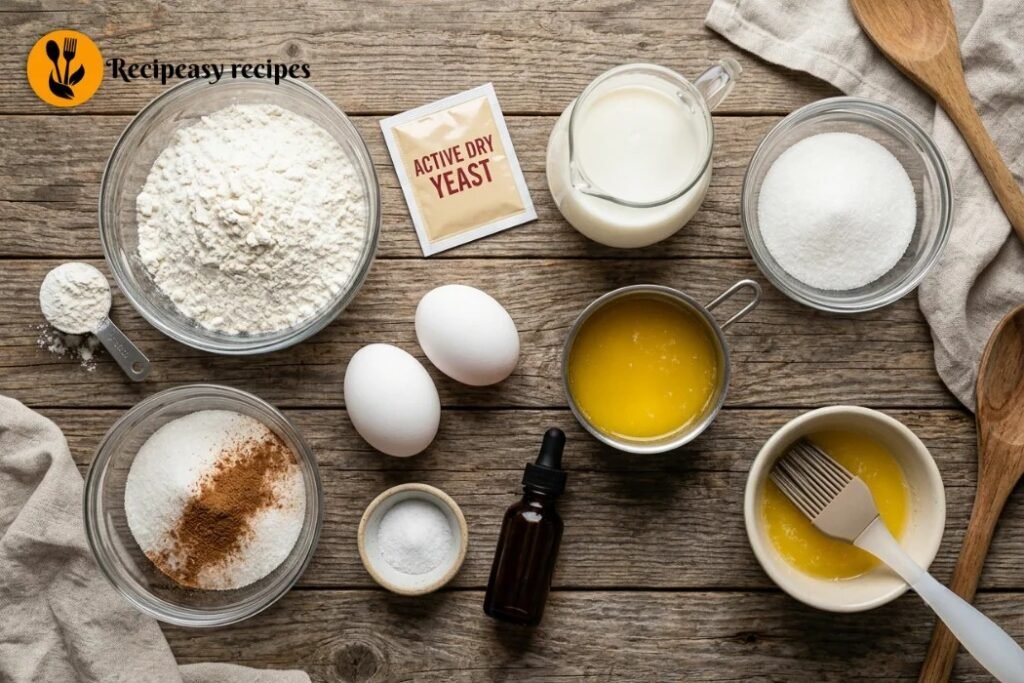
Ingredients
For the Dough
3 cups all-purpose flour
2 1/4 teaspoons active dry yeast
3/4 cup warm milk
1/4 cup granulated sugar
2 large eggs
1/4 cup unsalted butter, melted
1/2 teaspoon salt
1 teaspoon vanilla extract
For the Coating
1/2 cup granulated sugar
1 teaspoon ground cinnamon
3 tablespoons melted butter
Directions
- In a small bowl, combine warm milk, yeast, and a pinch of sugar. Let it sit for 8–10 minutes until foamy.
- In a large mixing bowl, whisk together flour, remaining sugar, and salt.
- Add the yeast mixture, eggs, melted butter, and vanilla extract to the dry ingredients. Mix until a shaggy dough forms.
- Knead the dough on a lightly floured surface for about 8 minutes until smooth and elastic.
- Place dough in a greased bowl, cover, and let rise for 1 hour or until doubled in size.
- Punch down the dough and divide it into 4 equal portions.
- Roll each portion into a long rope about 24–26 inches long.
- Wrap each rope around a greased cylindrical mold or foil-covered rolling pin in a spiral shape.
- Brush generously with melted butter.
- Mix cinnamon and sugar together, then roll the dough in the mixture until evenly coated.
- Preheat oven to 400°F (200°C).
- Place the wrapped molds on a baking rack over a lined baking tray.
- Bake for 18–22 minutes until golden brown and caramelized, rotating halfway through baking.
- Cool for 3–4 minutes before carefully sliding the chimney cakes off the molds.
- Serve warm for the best texture and flavor.
Notes
- Warm milk should feel slightly warm, not hot, to properly activate the yeast.
- Rotate the chimney cakes halfway through baking for even browning.
- A thinner mold creates more chewy layers, while wider molds create softer layers.