Authentic Italian Focaccia Recipe | Soft, Golden & Easy Bread
The authentic Italian focaccia recipe is one of those dishes that instantly makes your kitchen smell like a cozy Italian bakery. I still remember the first time I tried making it at home the aroma of warm olive oil, herbs, and freshly baked bread filled the air and made the whole experience unforgettable. The texture was perfect: golden and crispy on the outside, soft and fluffy on the inside.
This bread has become a weekend ritual for me. Every time I bake focaccia, it reminds me how simple ingredients can create something so magical. Whether you’re new to baking or already love making bread, this recipe will surprise you with its ease and flavor.
A of History Italian Focaccia Recipe
Focaccia’s history stretches back to ancient Rome, where it was first called panis focacius a flatbread baked on a hearth or “focus.” Over time, it became a staple in Liguria, a northern Italian region famous for its olive oil and coastal flavors. Ligurian bakers refined this humble bread, adding olive oil and herbs to create what we now recognize as traditional Italian focaccia. Today, every region in Italy has its own twist on this bread some soft and thick, others crisp and thin but all equally delicious.
What is Italian Focaccia Bread?
Italian focaccia is a savory flatbread made from a simple dough of flour, yeast, water, salt, and olive oil. What sets it apart is its dimpled surface, which holds tiny pools of olive oil that crisp beautifully during baking. Unlike pizza dough, focaccia has a richer, more tender crumb due to the generous use of oil. It’s often seasoned with herbs like rosemary, thyme, or oregano, and sometimes topped with onions, olives, or cherry tomatoes for extra flavor.

Why Try Italian Focaccia Recipe
You’ll fall in love with this recipe because it’s simple yet deeply satisfying. It doesn’t require advanced baking skills just patience and good-quality olive oil. The result is a bread that’s soft, flavorful, and perfect for any occasion. Whether you want to enjoy it with soup, make a sandwich, or serve it as an appetizer, focaccia always adds a touch of homemade warmth to your meal.
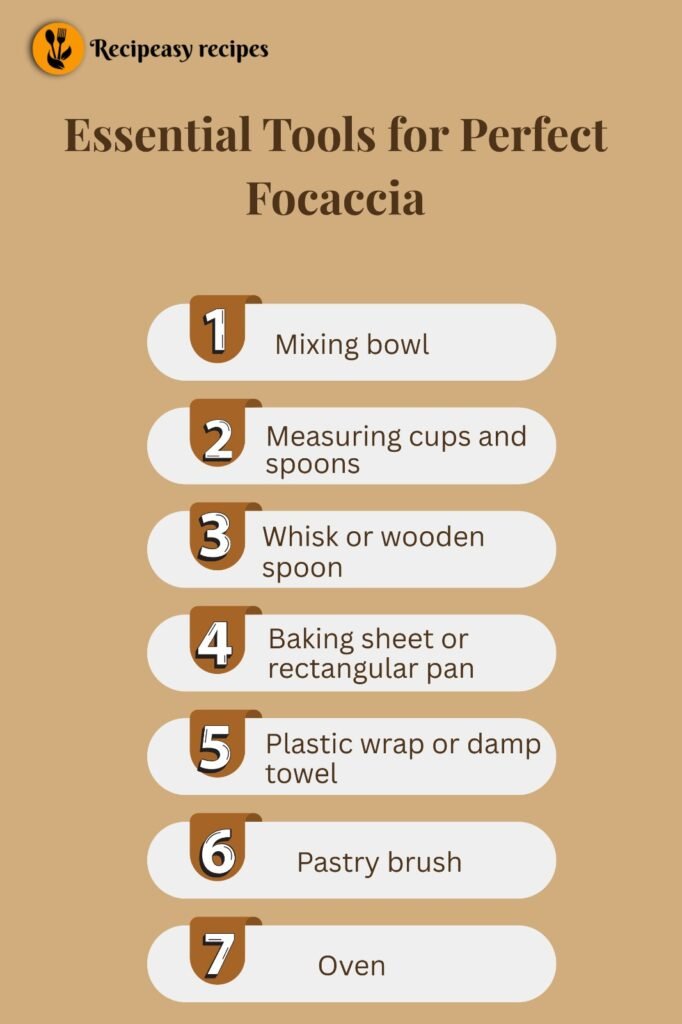
Essential Tools for Perfect Focaccia
Before you begin, make sure you have the right equipment ready:
Mixing bowl: For combining and kneading the dough.
Measuring cups and spoons: To keep ingredient ratios precise.
Whisk or wooden spoon: Helps mix the yeast and water smoothly.
Baking sheet or rectangular pan: Ideal for shaping and baking focaccia evenly.
Plastic wrap or damp towel: Used to cover the dough during rising.
Pastry brush: For brushing olive oil on the dough before baking.
Oven: Preheated for even baking and a crispy crust.
Ingredients of Italian Focaccia
To make this delicious homemade Italian focaccia bread, you’ll need:
4 cups all-purpose flour
1 ½ cups warm water
2 ¼ tsp active dry yeast
1 tsp sugar
1 ½ tsp salt
¼ cup extra virgin olive oil (plus more for brushing)
Fresh rosemary sprigs (optiona
Coarse sea salt for sprinkling
Cherry tomatoes, sliced onions, or olives (optional toppings)
How to Make Italian Focaccia Recipe (Step-by-Step Guide)
This authentic italian focaccia recipe is broken into clear phases prepare, build, rest, shape, top, and bake so you always know what to do next. Follow each phase slowly and pay attention to the small cues (texture, smell, bubbles) described below.
1). Activate & Check Yeast
Measure warm water (about 38–42°C / 100–108°F). It should feel pleasantly warm, not hot.
Stir in 1 tsp sugar and the active dry yeast. Mix gently and leave undisturbed.
Wait 5–12 minutes: look for a foamy, bubbly layer on top. That foam means yeast is alive.
Troubleshoot: No foam after 12 minutes yeast may be old or water too hot/cold. Discard and start with fresh yeast & correct water temp.
2). Mix Dough
In a large bowl combine 4 cups all-purpose flour and 1½ tsp salt. Mix briefly to distribute salt.
Create a well in the center and pour in the foamy yeast mix + ¼ cup olive oil.
Use a wooden spoon or dough scraper to fold in flour from the sides until a shaggy, sticky dough forms.
Texture cue: Dough should be tacky and slightly wet not dry or floury. If it’s too dry add 1 tablespoon water at a time; too wet, dust with a little flour.
3). Knead
Lightly flour your work surface. Turn dough out and knead with the heel of your hand.
Stretch and fold method: push dough away, fold back, rotate. Repeat.
Knead 8–10 minutes until the dough becomes smooth, elastic, and slightly shiny.
Finger test: Press a finger in dough should slowly spring back.
Tip: A slightly tacky dough is normal; heavy flouring will make the focaccia dense.
4). First Rise (Bulk Fermentation)
Drizzle a little olive oil in a clean bowl and place the dough inside. Turn to coat with oil.
Cover tightly with plastic wrap or a damp towel and place in a warm, draft-free spot.
Wait until doubled in size (about 1–1.5 hours).
Visual cues: Dough will look puffed and show small surface bubbles.
Pro tip: For deeper flavor, refrigerate for a slow cold overnight proof (8–24 hours). Bring back to room temp before shaping.
5). Shape & Pan Prep
Generously oil your baking sheet or rectangular pan (olive oil encourages a crisp bottom).
Gently transfer the risen dough to the oiled pan avoid degassing completely; you want some airy structure to remain.
Using oiled fingers, gently stretch the dough to the pan edges. If it resists, let it rest 5–10 minutes then continue dough relaxes and stretches easier.
Tip: Don’t tear the dough; mild elasticity helps create an open crumb.
6). Dimpling & Topping
With well-oiled fingertips, press gently into the dough to create deep dimples (about 1 cm deep) across the surface. The dimples trap oil and create the signature focaccia pockets.
Generously drizzle extra virgin olive oil so it pools in the dimples.
Scatter coarse sea salt, fresh rosemary leaves, and optional toppings like halved cherry tomatoes or olives. Press toppings lightly so they sink into the dimples.
Flavor tip: For stronger aroma, bruise rosemary between your fingers before scattering to release oils.
7). Second Rise
Cover loosely and let the shaped, topped dough rest until visibly puffed (about 20–40 minutes).
This final rise gives the focaccia its cloud-like interior and helps toppings meld.
Quick check: If you lightly press a dimple and the dough springs back slowly, it’s ready to bake.
8). Bake to Golden
Preheat oven to 220°C (425°F). Place a rack in the center.
Bake 20–25 minutes for a medium thickness focaccia, or 25–30 minutes for a thicker pan until the surface is deeply golden and the edges are crisp.
Optional: For extra crispiness, finish under broiler for 1–2 minutes watch closely to avoid burning.
Doneness cues: Sound test tap the bottom of the focaccia (slip spatula under a corner) and listen for a hollow sound. Color deep golden brown top and edges.
9). Resting & Serving
Remove from oven and immediately brush with a little more olive oil for shine and flavor.
Let rest in the pan for 8–10 minutes so crumb sets and slicing is easier.
Transfer to a cutting board and slice warm. Serve with olive oil, balsamic, or as sandwich bread.
Quick Troubleshooting & Best-Practice Checklist
Dense crumb: Likely under-proofed or over-kneaded. Let dough rise longer next time; knead less if overworked.
Too oily surface: Blot excess oil with paper towel before serving.
Huge air pockets: Degas gently before shaping and press dimples more evenly.
Pale top, soggy bottom: Bake longer at slightly lower rack position or increase oven temp briefly. Make sure pan is well-oiled but not dripping.
Variations You Can Try (Short & Practical)
Crispy Crust Focaccia: Use a thin layer of oil on the pan, bake a few minutes longer, and broil briefly.
Herbed Garlic Focaccia: Add thinly sliced garlic between dimples and sprinkle mixed Italian herbs.
Cheesy Focaccia: Scatter shredded mozzarella or parmesan over toppings 5–7 minutes before end of baking so cheese melts but doesn’t burn.
Prep Time, Cook Time & Serving Time
Prep Time: 15 minutes
Cook Time: 25 minutes
Total Time: 1 hour 40 minutes (including rising time)
Nutrition Information of Recipe
Calories: 210 per serving
Protein: 5g
Fat: 7g
Carbohydrates: 35g
Fiber: 2g
Sodium: 240mg
How to Serve Italian Focaccia Recipe
Serve focaccia warm, brushed with a little extra olive oil. It’s fantastic alongside soups, salads, or pasta dishes. You can also slice it horizontally to make sandwiches filled with mozzarella, basil, and tomatoes. For a simple snack, dip it in olive oil and balsamic vinegar it’s pure Italian comfort.
Benefits of This Recipe
Made with heart-healthy olive oil.
Rich in flavor but low in sugar.
Vegetarian-friendly.
Fresher and cleaner than store-bought breads.
Easy to customize with herbs or vegetables.
FAQs
1. What is the secret to soft focaccia?
Proper rising time and enough olive oil ensure a soft, pillowy texture.
2. Can I make focaccia without yeast?
Traditional focaccia requires yeast, but you can use baking powder for a quick, denser version.
3. Why do we dimple focaccia dough?
The dimples help hold the olive oil and prevent large air bubbles during baking.
4. How long does homemade focaccia stay fresh?
It stays soft for 2 days at room temperature. For longer storage, refrigerate or freeze it.
5. Can I use whole wheat flour?
Yes! Mix half all-purpose and half whole wheat for a nutty flavor and more fiber.
Conclusion
In the end, this authentic Italian focaccia recipe is more than just bread it’s a beautiful expression of Italian tradition and simplicity. With its golden crust, rich olive oil flavor, and comforting aroma, it’s perfect for any occasion. Once you make it yourself, you’ll never go back to store-bought bread again. So roll up your sleeves, warm up your oven, and bring a little piece of Italy right into your kitchen.

Authentic Italian Focaccia Recipe | Soft, Golden & Easy Bread
Course: SnacksCuisine: ItalianDifficulty: Easy4
servings15
minutes25
minutes210 per serving
kcalAuthentic Italian focaccia made with olive oil, herbs, and crispy golden crust — perfect Italian bread for every meal.
Ingredients
4 cups all-purpose flour
1 ½ cups warm water
2 ¼ tsp active dry yeast
1 tsp sugar
1 ½ tsp salt
¼ cup extra virgin olive oil (plus more for brushing)
Fresh rosemary sprigs (optional)
Coarse sea salt for sprinkling
Cherry tomatoes, sliced onions, or olives (optional toppings)
Directions
- Activate & Check Yeast
Measure warm water (about 38–42°C / 100–108°F). It should feel pleasantly warm, not hot.
Stir in 1 tsp sugar and the active dry yeast. Mix gently and leave undisturbed.
Wait 5–12 minutes: look for a foamy, bubbly layer on top. That foam means yeast is alive.
Troubleshoot: No foam after 12 minutes yeast may be old or water too hot/cold. Discard and start with fresh yeast & correct water temp. - Mix Dough
In a large bowl combine 4 cups all-purpose flour and 1½ tsp salt. Mix briefly to distribute salt.
Create a well in the center and pour in the foamy yeast mix + ¼ cup olive oil.
Use a wooden spoon or dough scraper to fold in flour from the sides until a shaggy, sticky dough forms.
Texture cue: Dough should be tacky and slightly wet not dry or floury. If it’s too dry add 1 tablespoon water at a time; too wet, dust with a little flour. - Knead
Lightly flour your work surface. Turn dough out and knead with the heel of your hand.
Stretch and fold method: push dough away, fold back, rotate. Repeat.
Knead 8–10 minutes until the dough becomes smooth, elastic, and slightly shiny.
Finger test: Press a finger in dough should slowly spring back.
Tip: A slightly tacky dough is normal; heavy flouring will make the focaccia dense. - First Rise (Bulk Fermentation)
Drizzle a little olive oil in a clean bowl and place the dough inside. Turn to coat with oil.
Cover tightly with plastic wrap or a damp towel and place in a warm, draft-free spot.
Wait until doubled in size (about 1–1.5 hours).
Visual cues: Dough will look puffed and show small surface bubbles.
Pro tip: For deeper flavor, refrigerate for a slow cold overnight proof (8–24 hours). Bring back to room temp before shaping. - Shape & Pan Prep
Generously oil your baking sheet or rectangular pan (olive oil encourages a crisp bottom).
Gently transfer the risen dough to the oiled pan avoid degassing completely; you want some airy structure to remain.
Using oiled fingers, gently stretch the dough to the pan edges. If it resists, let it rest 5–10 minutes then continue dough relaxes and stretches easier.
Tip: Don’t tear the dough; mild elasticity helps create an open crumb. - Dimpling & Topping
With well-oiled fingertips, press gently into the dough to create deep dimples (about 1 cm deep) across the surface. The dimples trap oil and create the signature focaccia pockets.
Generously drizzle extra virgin olive oil so it pools in the dimples.
Scatter coarse sea salt, fresh rosemary leaves, and optional toppings like halved cherry tomatoes or olives. Press toppings lightly so they sink into the dimples.
Flavor tip: For stronger aroma, bruise rosemary between your fingers before scattering to release oils. - Second Rise
Cover loosely and let the shaped, topped dough rest until visibly puffed (about 20–40 minutes).
This final rise gives the focaccia its cloud-like interior and helps toppings meld.
Quick check: If you lightly press a dimple and the dough springs back slowly, it’s ready to bake. - Bake to Golden
Preheat oven to 220°C (425°F). Place a rack in the center.
Bake 20–25 minutes for a medium thickness focaccia, or 25–30 minutes for a thicker pan until the surface is deeply golden and the edges are crisp.
Optional: For extra crispiness, finish under broiler for 1–2 minutes watch closely to avoid burning.
Doneness cues: Sound test tap the bottom of the focaccia (slip spatula under a corner) and listen for a hollow sound. Color deep golden brown top and edges. - Resting & Serving
Remove from oven and immediately brush with a little more olive oil for shine and flavor.
Let rest in the pan for 8–10 minutes so crumb sets and slicing is easier.
Transfer to a cutting board and slice warm. Serve with olive oil, balsamic, or as sandwich bread.
Notes
- Always use extra virgin olive oil for authentic flavor.
- Allow both rises for a lighter texture.
- For a crispy crust focaccia recipe, drizzle extra oil before baking.
- Don’t skip the dimpling it traps oil and gives the bread its signature look.
- Experiment with authentic focaccia with toppings like olives, garlic, or caramelized onions.