Brown Butter Chocolate Chip Cookies
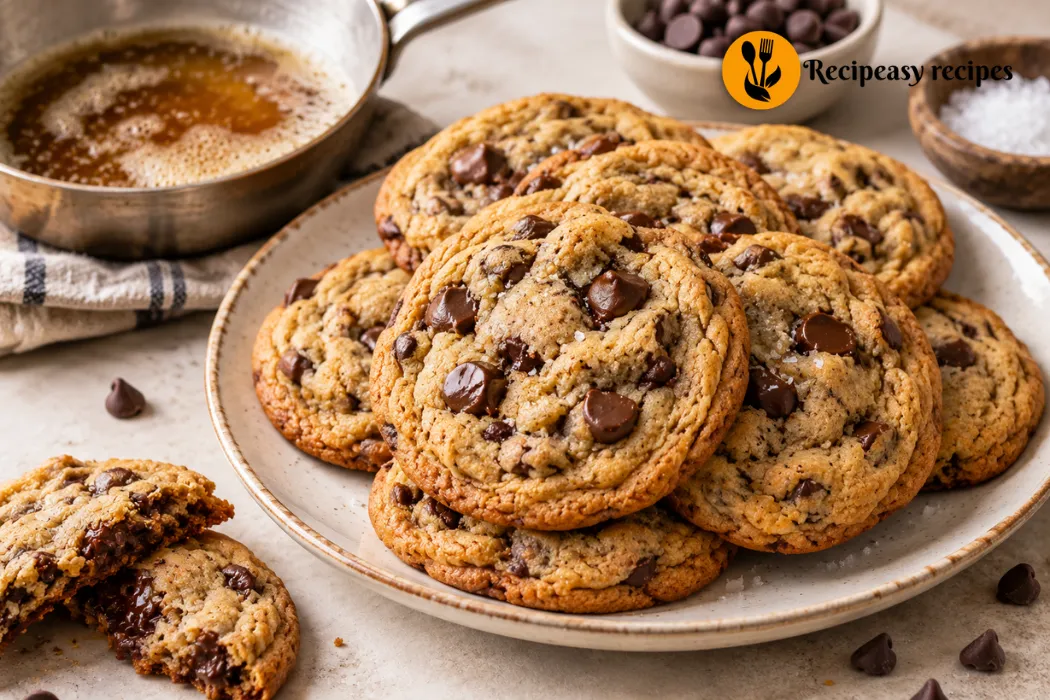
If you’ve only ever made chocolate chip cookies with regular melted butter, these Brown Butter Chocolate Chip Cookies are about to change everything. Browning the butter first adds a deep, nutty, almost caramel-like flavor that regular butter just can’t match.
Since this one extra step makes such a huge difference, it’s honestly worth the few extra minutes it takes.
Why Browning the Butter Matters So Much
First, browning butter cooks off the water content and toasts the milk solids until they turn golden and fragrant. Also, this process creates that signature nutty, caramelized flavor that makes these cookies taste so much richer than a standard recipe.
Plus, because the butter is browned instead of just melted, these turn into genuinely chewy chocolate chip cookies with crisp edges and soft, gooey centers, exactly what a great bakery cookie should be.
What You’ll Need
Here’s everything for this recipe. Nothing here is hard to find.
- 1 cup unsalted butter
- 2 1/4 cups all-purpose flour
- 1 teaspoon baking soda
- 1/2 teaspoon salt
- 1 cup packed brown sugar
- 1/2 cup granulated sugar
- 1 large egg
- 1 egg yolk
- 2 teaspoons vanilla extract
- 1 1/2 cups chocolate chips
- Flaky sea salt, for topping (optional)
Since brown sugar has more moisture and molasses than white sugar, using more of it here really helps keep these cookies soft in the middle. So don’t be tempted to swap the ratio around.
How to Make Brown Butter Chocolate Chip Cookies
This recipe takes a little extra patience compared to a basic cookie, but the process itself is still simple.
Step 1: Brown the butter.
In a light-colored saucepan, melt the butter over medium heat. Continue cooking, swirling occasionally, until it turns golden brown and smells nutty, about 5 to 7 minutes. Watch closely, since it can go from perfectly browned to burnt quickly.
Step 2: Cool the butter slightly.
Pour the browned butter into a heatproof bowl and let it cool for about 10 minutes. It should still be liquid, but not hot enough to cook the eggs later.
Step 3: Mix the dry ingredients.
In a separate bowl, whisk together the flour, baking soda, and salt. Set this aside for now.
Step 4: Combine the butter and sugars.
Whisk the cooled brown butter with the brown sugar and granulated sugar until smooth and well combined.
Step 5: Add the eggs and vanilla.
Whisk in the egg, egg yolk, and vanilla extract until the mixture looks glossy and slightly thickened.
Step 6: Bring it all together.
Add the dry ingredients to the wet ingredients, stirring just until combined. Then fold in the chocolate chips.
Step 7: Chill the dough.
Cover the bowl and refrigerate the dough for at least 30 minutes. This helps prevent the cookies from spreading too much while baking.
Step 8: Scoop and bake.
Preheat your oven to 350°F. Scoop the dough into balls, place them on a lined baking sheet, and bake for 10 to 12 minutes, until the edges turn golden but the centers still look slightly underdone.
Step 9: Cool and finish.
Let the cookies cool on the baking sheet for a few minutes before transferring them to a wire rack. If using, sprinkle a little flaky sea salt on top while they’re still warm.
Tips for the Best Results
Since burnt butter can taste bitter instead of nutty, keep a close eye on the pan while browning it. As soon as you see brown specks forming and smell that toasty aroma, pull it off the heat.
Also, don’t skip chilling the dough. Since browned butter is more liquid than regular softened butter, skipping this step can leave you with cookies that spread too thin.
For truly best chocolate chip cookies, pull them from the oven while the centers still look a little underbaked. They’ll continue cooking slightly on the hot pan, which is exactly what keeps the middle soft instead of dry.
Additionally, using both a whole egg and an extra egg yolk adds richness and helps create that fudgy, chewy texture throughout the whole cookie, not just around the edges.
Easy Variations to Try
This brown butter cookie recipe is easy to customize based on what you’re craving.
For instance, swap regular chocolate chips for chopped chocolate bars if you want those big, melty pools of chocolate throughout. Or, if you love a little crunch, fold in a handful of chopped walnuts or pecans along with the chocolate.
Additionally, a sprinkle of flaky sea salt on top isn’t just for looks. It genuinely balances the sweetness and makes the brown butter flavor stand out even more.
Storing Your Cookies
Once completely cooled, store the cookies in an airtight container at room temperature for up to 5 days.
For longer storage, freeze the baked cookies in a freezer-safe bag for up to 3 months. You can also freeze the raw dough balls and bake them straight from frozen, just add an extra minute or two to the bake time.
Common Questions
Can I skip browning the butter to save time?
You can, but the flavor will be noticeably different. The nutty, caramel-like taste from browned butter is really what sets this recipe apart.
Why did my cookies spread too much?
This usually means the dough wasn’t chilled long enough, or the butter was still too warm when mixed with the sugar.
Can I make the dough ahead of time?
Yes. The dough can be refrigerated for up to 3 days, and the flavor actually deepens the longer it sits.
Why do my cookies taste bitter?
This is often a sign the butter was burnt instead of browned. Keep a close eye on the pan and remove it as soon as it turns golden and smells nutty.
Final Thoughts
At the end of the day, these Brown Butter Chocolate Chip Cookies prove that one small extra step can completely transform a classic recipe. They’re rich, they’re chewy, and they taste like something straight out of a bakery. So the next time you’re craving homemade cookies, give this version a try. It might just become your new favorite.