The Smoky, Earthy Chile Pasilla Recipe I Make Every Winter
There’s a dried chile that doesn’t get nearly enough credit, and it’s the pasilla. Not as flashy as an ancho, not as punchy as a guajillo but somehow it delivers this deep, almost chocolatey warmth that makes a dish taste like it simmered for hours, even when it didn’t. I stumbled onto my first proper chile pasilla recipe a few winters back when I was trying to make something more interesting than my usual weeknight rotation, and honestly, it changed how I think about dried chiles altogether.
What I make most often now is a pasilla-braised chicken dark, glossy, intensely savory, the kind of thing that makes your kitchen smell like a proper Mexican kitchen. It takes some attention but it’s not complicated. And once you understand how the pasilla works, you’ll want to use it in everything.
First, Let’s Talk About the Chile Itself
If you’ve never cooked with pasilla before, the first thing to know is that it looks almost black. Long, wrinkled, deep brownish-black skin which is actually where the name comes from, since “pasilla” loosely refers to its raisin-like appearance. The passila ingredients you’ll need are simple: dried pasilla chiles, which you can find at most Latin grocery stores or online. Don’t substitute with fresh poblanos here dried pasilla and fresh poblano are related but they behave completely differently in cooking.
When you open a bag of good dried pasillas, there’s this immediate smell earthy, slightly sweet, a little musty in the best way. Almost like dried fruit mixed with dark chocolate. That aroma is basically a preview of what your sauce will taste like.
For this recipe, you’ll use about 4 to 5 dried pasilla chiles. That’s enough to build real depth without the sauce turning bitter.
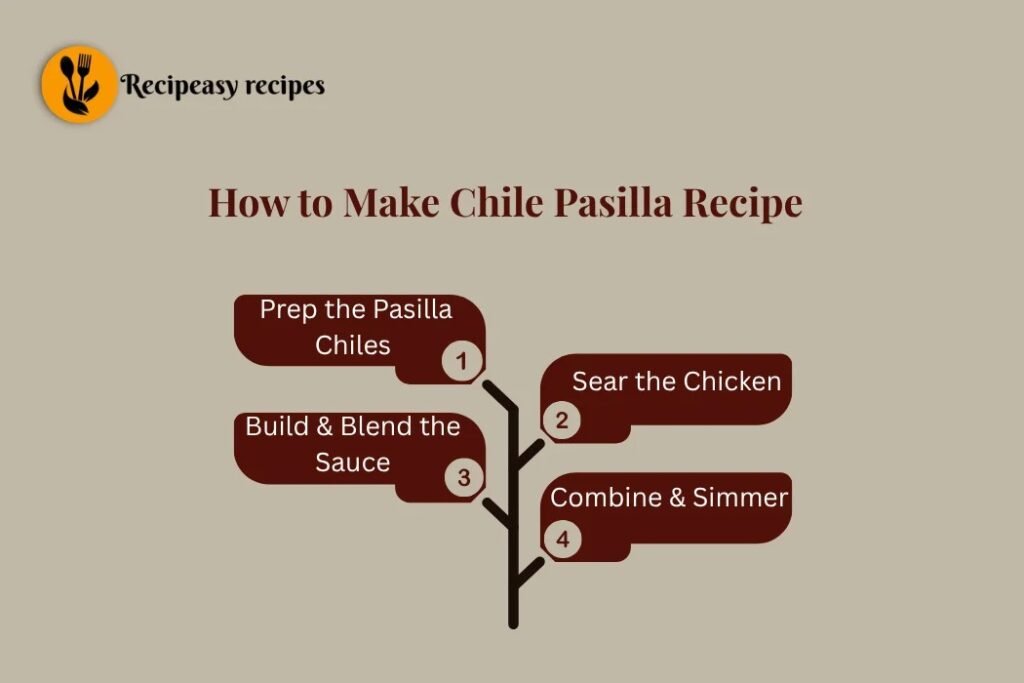
Getting the Chiles Ready (Don’t Skip This Part)
Toast them first. I skipped this once when I was in a hurry and the difference was noticeable the sauce tasted flat and a little raw. It only takes two minutes but it matters.
Heat a dry skillet on medium and press each chile flat against the surface for about 20 to 30 seconds per side. You’ll see them puff slightly and smell that earthy fragrance intensify. Pull them off before they start to smoke if they get dark patches or smell bitter, they’ve gone too far. I’ve done that too, and unfortunately there’s no fixing an over-toasted chile.
After toasting, remove the stems and shake out the seeds. Then submerge the chiles in hot water for about 20 minutes until they’re completely soft and pliable. I usually put a small plate on top to keep them from floating. Meanwhile, you can prep everything else.
The Chicken — How I Build This Dish
This works beautifully as one of those recipes chicken dishes where the protein soaks up the sauce rather than sitting on top of it. Bone-in, skin-on thighs are the best choice here. They stay moist through the braising process and the fat from the skin enriches the sauce in a way that boneless pieces just don’t.
You’ll need:
— 6 bone-in chicken thighs — Salt and pepper — 1 tablespoon neutral oil — 1 medium white onion, roughly chopped — 4 cloves garlic, unpeeled — 1/2 teaspoon cumin — 1/4 teaspoon cinnamon (just a little — don’t skip it) — 1 cup chicken broth — 1 teaspoon apple cider vinegar
Season the chicken generously with salt and pepper. Heat oil in a heavy pot or Dutch oven and sear the thighs skin-side down until deep golden brown about 6 to 7 minutes. Don’t rush this. The fond that builds on the bottom of the pot is flavor you’re going to use. Flip and sear the other side for 3 minutes, then set the chicken aside.
Building the Sauce Around the Chiles
In the same pot, add the chopped onion and let it soften in the leftover fat for about 5 minutes. Also add the garlic still unpeeled and let it char slightly alongside the onion. This might seem odd but roasting the garlic this way gives the sauce a gentler, more rounded flavor compared to raw minced garlic. Once the skins look papery and the garlic feels soft when pressed, peel them and toss the skins.
Now drain your soaked pasilla chiles and add them to the pot along with the softened onion, garlic, cumin, cinnamon, and chicken broth. Blend everything together until smooth I use an immersion blender directly in the pot, but a regular blender works fine. Just be careful with the hot liquid and blend in batches if needed.
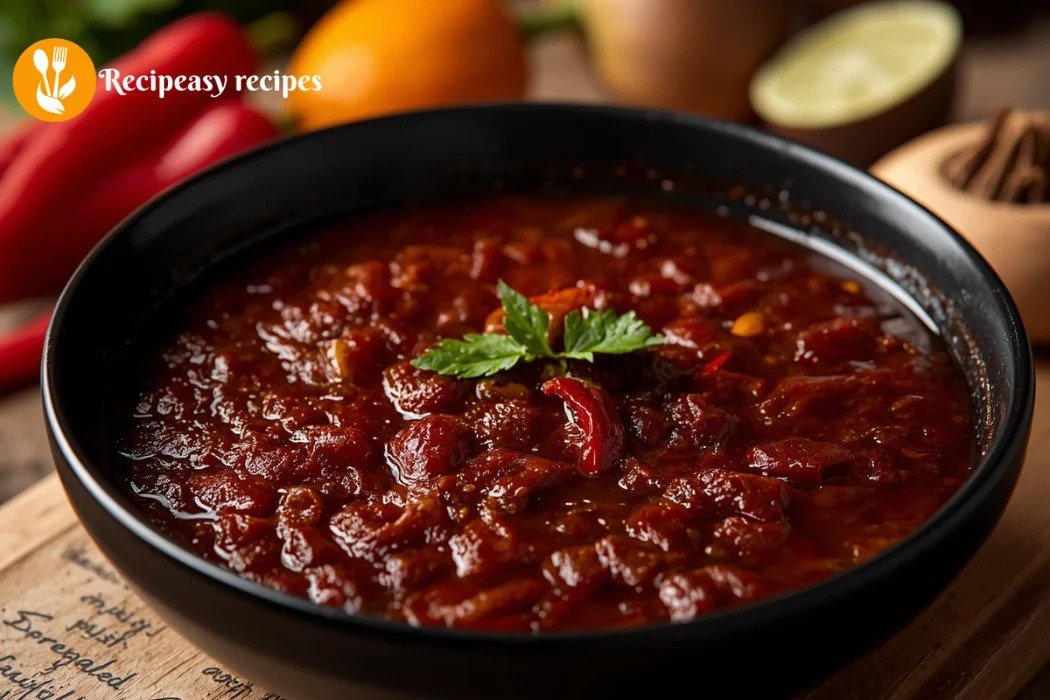
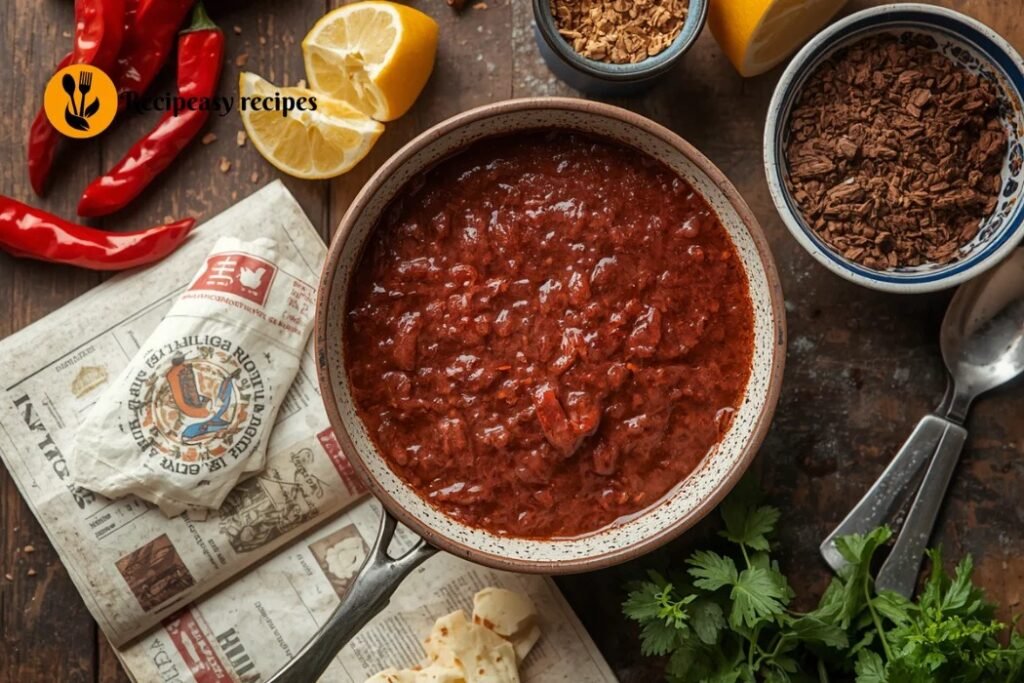
The sauce at this point should be a dark, deep reddish-brown. Taste it. It should be earthy, slightly smoky, a touch bitter not sweet yet, not perfectly balanced. That’s fine. It comes together during the braise.
Pour the blended sauce back into the pot (or strain it through a medium sieve if you want a silkier texture I usually skip this step because I don’t mind a little body in the sauce). Nestle the seared chicken thighs back in, spoon sauce over each piece, and bring everything to a gentle simmer.
The Braise — Low and Slow Wins
Cover the pot and let it cook on low heat for 35 to 40 minutes. This is genuinely one of the more easy recipes to walk away from there’s nothing to stir constantly or watch carefully. The chicken braises in that dark sauce, becoming tender and deeply flavored while the sauce reduces and concentrates around it.
About halfway through, I usually lift the lid and spoon the sauce over the top of each thigh. Also, this is a good time to taste and adjust a little more salt, maybe an extra pinch of cumin if it needs it. The teaspoon of apple cider vinegar goes in during the last 10 minutes of cooking. It sounds like a small thing but it genuinely lifts the sauce and stops it from tasting too heavy or one-dimensional.
When it’s done, the chicken should be fall-off-the-bone tender and the sauce should be thick enough to coat a spoon. If the sauce still looks thin after the chicken is cooked through, remove the chicken temporarily and let the sauce reduce uncovered for another 5 to 8 minutes on medium heat.
How to Serve It
I almost always serve this over white rice the sauce soaks into it and every bite is good. However, warm corn tortillas alongside work just as well, especially if you want to eat it more casually, tearing pieces of chicken and wrapping them up. A quick topping of thinly sliced white onion, fresh cilantro, and a squeeze of lime over the top adds brightness that cuts through the richness of the sauce.
This is also one of those simple recipes that genuinely improves overnight. If you have leftovers, the flavor deepens considerably by the next day. I’ve reheated it for lunch the following afternoon and it tasted even better than the night before.
A Couple of Things Worth Mentioning
If you can’t find pasilla chiles and want to try a roasted chile variation, you can substitute with 2 ancho chiles and 2 mulato chiles it won’t be exactly the same but it’ll get close. The ancho brings similar sweetness and the mulato adds that dark, earthy quality.
Also, how to make the sauce less bitter if you accidentally over-toast the chiles: a small piece of Mexican chocolate or a teaspoon of brown sugar blended into the sauce usually balances things out without making it taste sweet. It’s a rescue trick I’ve used more than once.
One last thing don’t be put off by the prep time with dried chiles. The toasting and soaking is maybe 25 minutes of mostly passive work, and the payoff is a sauce that tastes genuinely complex and layered. Nothing like the jarred stuff.
Summary
A good chile pasilla recipe doesn’t need a long ingredient list or advanced technique it just needs a little patience and respect for what the chile can do. Once you’ve made this version, I’d bet you’ll start keeping dried pasillas stocked in your pantry the same way I do. They’re one of those quiet ingredients that make everything around them taste better.
FAQs
1. What is a chile pasilla recipe?
A chile pasilla recipe uses dried pasilla chiles to create a rich, smoky, and slightly earthy sauce often paired with meats like chicken or beef.
2. Can I substitute pasilla chiles in this chile pasilla recipe?
Yes, you can use ancho and mulato chiles as a substitute, though the flavor will be slightly different.
3. Why is my chile pasilla sauce bitter?
Bitterness usually comes from over-toasting the chiles. You can balance it by adding a small amount of sugar or chocolate.
4. Can I make this chile pasilla recipe ahead of time?
Yes, this dish tastes even better the next day as the flavors deepen during storage.
5. What is the best way to serve this chile pasilla recipe?
It’s best served with rice or tortillas, along with fresh toppings like cilantro, onion, and lime juice.

The Smoky, Earthy Chile Pasilla Recipe I Make Every Winter
Course: MainCuisine: MexicanDifficulty: Easy6
servings25
minutes40
minutes500
kcalIngredients
For the Chile Pasilla Sauce:
4–5 dried pasilla chiles
1 medium white onion (chopped)
4 cloves garlic (unpeeled)
½ tsp cumin
¼ tsp cinnamon
1 cup chicken broth
1 tsp apple cider vinegar
For the Chicken:
6 bone-in, skin-on chicken thighs
Salt and black pepper
1 tbsp neutral oil
Directions
- Toast the Chiles:
Heat a dry skillet and toast pasilla chiles for 20–30 seconds per side until fragrant (not burnt). - Soak the Chiles:
Remove stems and seeds. Soak in hot water for 20 minutes until soft. - Sear the Chicken:
Season chicken with salt and pepper. Heat oil in a pot and sear skin-side down for 6–7 minutes until golden. Flip and cook 3 minutes more. Remove and set aside. - Cook Aromatics:
In the same pot, cook chopped onion for 5 minutes. Add garlic (with skin) and lightly char. Peel garlic after softening. - Blend the Sauce:
Add soaked chiles, onion, garlic, cumin, cinnamon, and broth. Blend until smooth. - Braise the Chicken:
Return sauce to pot, add chicken, and spoon sauce over. Cover and simmer on low for 35–40 minutes. - Finish the Flavor:
Add apple cider vinegar in the last 10 minutes. Adjust salt and spices. - Thicken if Needed:
If sauce is thin, remove chicken and simmer sauce uncovered for 5–8 minutes.
Notes
- Don’t skip toasting the chiles — it builds deep flavor
- Avoid over-toasting or the sauce may turn bitter
- The dish tastes even better the next day
- Add a bit of chocolate or brown sugar if bitterness needs balancing