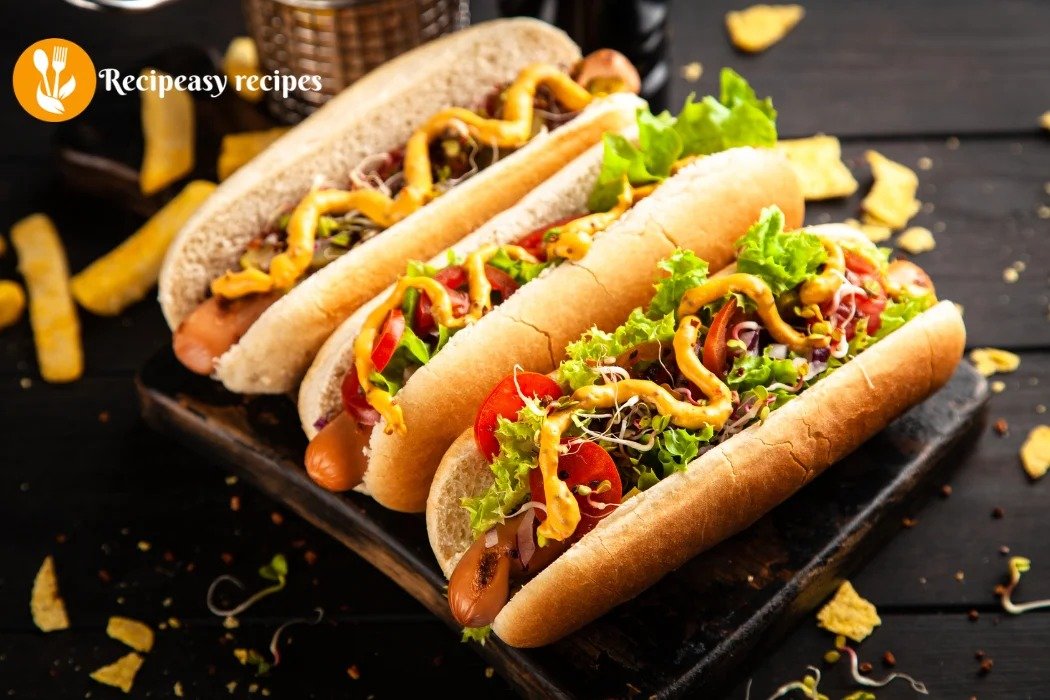
The Best Chili Cheese Dog Recipe I’ve Made at Home (And I’ve Made It a Lot)
There’s something about a chili cheese dog that hits differently on a lazy weekend afternoon. I don’t even remember exactly when I started making them at home, but I do remember the first time I realized the ones I was making were genuinely better than what I was getting from the hot dog stands down the street. That was a turning point.
This isn’t a fancy dish. It never pretended to be. But getting a chili cheese dog recipe right like actually right, where the chili clings to the dog, the cheese melts into every crevice, and the bun holds everything together without falling apart takes a few tries. At least it did for me.
Let me walk you through how I make it now, after all the small disasters and happy accidents along the way.
Start With a Chili That Actually Tastes Like Something
The biggest mistake I made early on was using canned chili straight out of the can. And honestly? It’s not terrible in a pinch. But once I started making a quick stovetop chili from scratch even a simple one there was no going back.
Here’s what I use for the chili sauce for dogs:
Half a pound of ground beef (80/20 works best the fat adds flavor) One small onion, finely diced Two cloves of garlic, minced One cup of tomato sauce A tablespoon of chili powder Half a teaspoon of cumin Salt and pepper to taste A small splash of Worcestershire sauce (this is the secret, honestly)
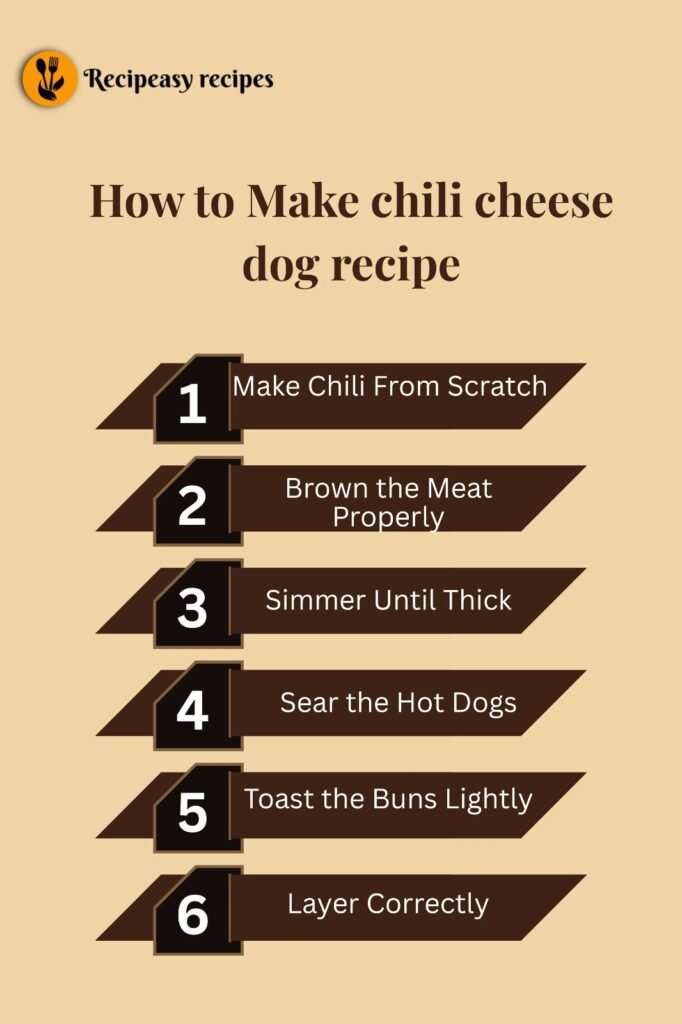
I brown the ground beef first in a skillet over medium-high heat, breaking it apart as it cooks. One thing I learned the hard way don’t rush this step. The first time I made it, I moved to the next step too fast and the meat ended up steaming instead of browning. Browned meat gives you that deep, savory flavor that makes the chili taste like it’s been cooking for hours.
Once the beef is cooked through, I drain most of the fat not all of it, just most. Then the onion goes in, and I let that soften for about three minutes. Add the garlic, stir it around for thirty seconds or so, and then pour in the tomato sauce.
Now comes the seasoning. I add the chili powder, cumin, Worcestershire, salt, and pepper. Stir everything together, lower the heat, and let it simmer uncovered for about ten to fifteen minutes. You want it to thicken up so it’s not watery. A loose chili will slide right off the dog and soak the bun in about four seconds flat learned that the fun way.
While That’s Simmering — The Dogs
I used to boil my hot dogs without thinking twice. Then someone told me to try searing them in a dry pan for a couple minutes, just until they get a little color on the outside. I rolled my eyes at first, but it genuinely makes a difference. The skin gets slightly firm and snappy, and the whole thing just tastes more… intentional? I know that sounds dramatic for a hot dog, but it’s true.
Also, pick a dog that actually has some flavor to it. Beef franks work great here. All-pork franks are good too. The mild, pale ones tend to get lost under all that chili and cheese.
The Bun Situation
Soft buns that you can lightly toast that’s the move. I run a little butter on the inside of each bun and press it flat on the skillet for a minute or two. Just enough to get a light golden color. This stops the bun from going completely soggy once the chili hits it, and it adds this subtle buttery flavor that you don’t notice until it’s missing.
Don’t over-toast. I’ve done it. You end up with something closer to toast than a bun, and it cracks in half when you try to eat it.
Putting It Together — The Order Matters More Than You Think
Dog goes in the bun first. Then a generous spoonful of chili and by generous I mean actually generous. Don’t be shy here. This is not the time for portion control.
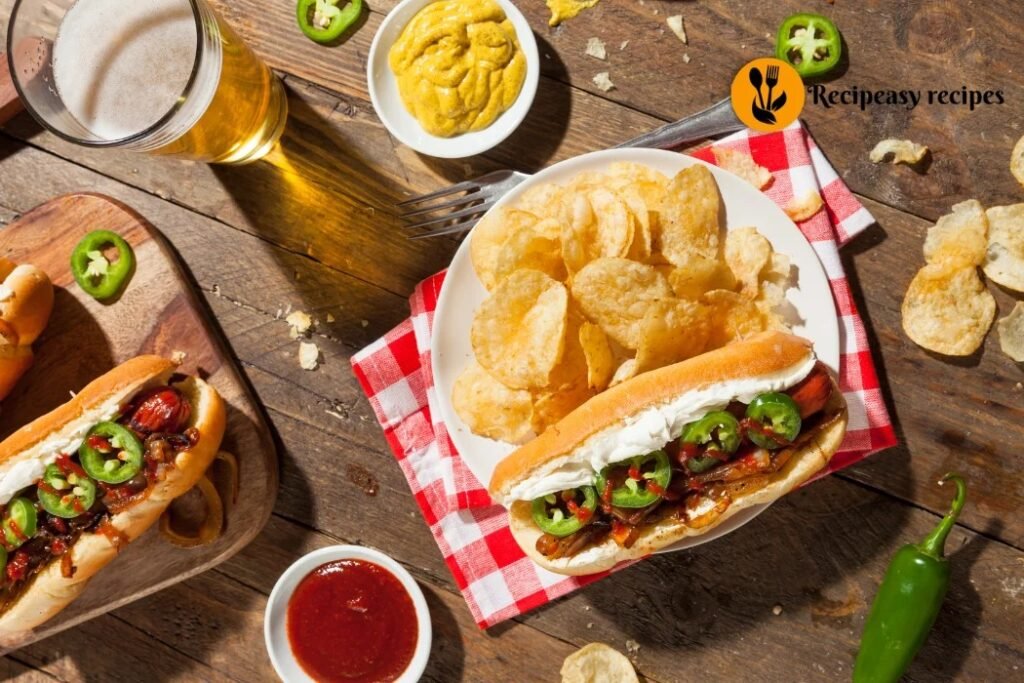
Then the cheese. I use finely shredded sharp cheddar most of the time. The fine shred melts faster and coats everything more evenly than the thick-cut stuff. If you want to go all out, a drizzle of warm processed cheese sauce works incredibly well too it’s the classic diner-style choice, and there’s a reason it’s been around forever.
After the cheese, that’s when I think about toppings. And this is where things get personal.
Toppings — Keep It Simple or Go Wild
For me, the classic toppings are: a thin line of yellow mustard, some finely diced raw white onion, and maybe a few pickled jalapeño slices if I want some heat. That’s it. The chili and cheese are doing the heavy lifting, so I don’t pile on too much else.
However, I’ve had versions with coleslaw on top (weirdly good), a little hot sauce drizzled over (also great), and once even some crumbled bacon (obviously great it’s bacon). So don’t feel like you have to follow a strict formula. Part of the fun with this dish is customizing it.
One thing I’d avoid: raw tomatoes. They release water and make the whole thing soggy. If you want that freshness, go with a tiny bit of diced red onion or just skip it.
Making It Easy on Yourself — Batch Tips
If you’re making these for a group, the chili can be made ahead of time. It actually tastes better the next day once the flavors settle in. I usually make a big batch on Saturday, refrigerate it overnight, and then Sunday is basically effortless.
The chili reheats well in a small saucepan over low heat just add a splash of water if it’s gotten too thick. Also, keeping it warm in a small slow cooker during a gathering is a total game changer. People can build their own dogs, and you’re not stuck reheating constantly.
Also, the simple rule for gatherings: set out everything separately and let people assemble. Toppings in small bowls, cheese ready to go, buns toasted in batches. It becomes way more fun that way, and honestly less stressful for whoever’s in the kitchen.
A Few Things I Wish I’d Known Sooner
The chili should be on the thicker side. I can’t stress this enough. If it’s runny, the whole thing becomes a mess and not the good kind of mess.
Don’t use shredded cheese straight from the fridge. Let it sit out for a few minutes. Cold cheese on hot chili doesn’t melt as smoothly, and you end up with these weird clumps that don’t fully integrate. Room temperature cheese melts beautifully.
And finally, eat it immediately. The longer it sits, the soggier the bun gets. This is not a dish that waits patiently.
The Whole Point
A good chili cheese dog recipe doesn’t need to be complicated. The ingredients are straightforward, the process is manageable even on a busy day, and the result is one of those comfort foods that just puts people in a good mood. I’ve made this for family dinners, backyard hangouts, and honestly, just for myself on a Tuesday night when I didn’t want to think too hard about cooking.
The chili makes it. Give that part your attention, and everything else falls into place naturally. Once you get the hang of it, you’ll find yourself making little adjustments more heat here, different cheese there and slowly it becomes your own version. That’s kind of the best part.
The Best Chili Cheese Dog Recipe I’ve Made at Home (And I’ve Made It a Lot)
Course: MainCuisine: AmericanDifficulty: Easy4
servings10
minutes20
minutes450
kcalThis chili cheese dog recipe features juicy hot dogs, thick homemade chili, and perfectly melted cheese on a lightly toasted bun. It’s quick, customizable, and perfect for weekends, parties, or an easy comfort meal.
Ingredients
For the Chili:
½ lb ground beef (80/20)
1 small onion (finely diced)
2 garlic cloves (minced)
1 cup tomato sauce
1 tbsp chili powder
½ tsp cumin
Salt & pepper (to taste)
1 tbsp Worcestershire sauce
For the Dogs:
4 beef or pork hot dogs
4 soft hot dog buns
1 tbsp butter (for toasting)
Toppings:
1 cup shredded sharp cheddar cheese
Yellow mustard (optional)
Diced onions (optional)
Pickled jalapeños (optional)
Directions
- Step 1: Make the Chili
Heat a skillet over medium-high heat and brown the ground beef.
Drain excess fat (leave a little for flavor).
Add diced onion and cook for 3 minutes.
Stir in garlic and cook for 30 seconds.
Add tomato sauce, chili powder, cumin, Worcestershire sauce, salt, and pepper.
Simmer uncovered for 10–15 minutes until thick. - Step 2: Cook the Hot Dogs
Heat a pan over medium heat.
Sear hot dogs until lightly browned on all sides. - Step 3: Toast the Buns
Spread butter inside buns.
Toast in a skillet until lightly golden. - Step 4: Assemble
Place hot dog in bun.
Add a generous layer of chili.
Sprinkle shredded cheese on top.
Add optional toppings like mustard, onions, or jalapeños.
Notes
- Keep the chili thick to avoid soggy buns.
- Let cheese sit at room temperature before using for better melting.
- Chili can be made ahead and tastes even better the next day.
- Toasted buns help hold everything together.